
The Gear Used in the Video
- Check out Sonarworks Reference 4 Studio Edition: https://bhpho.to/2FFuuob
- Ultimate Support MS-90 Monitor Stands: https://bhpho.to/2qU39oX
- IsoAcoustics Studio Monitor Isolators: https://bhpho.to/2Cr9spf
- Primacoustic Scatter Blocks: https://bhpho.to/2CBinF1
- Full Primacoustic Room Treatment Kit: https://bhpho.to/2CuoP0u
Do you ever feel like you can’t properly hear what changes to make in your mixdowns?
Do you have to run to your car 10 times per track to hear how it “really” sounds? Ever finish your tune, then CRINGE when you hear it somewhere else because it sounds too thin, muddy, or lacks clarity?
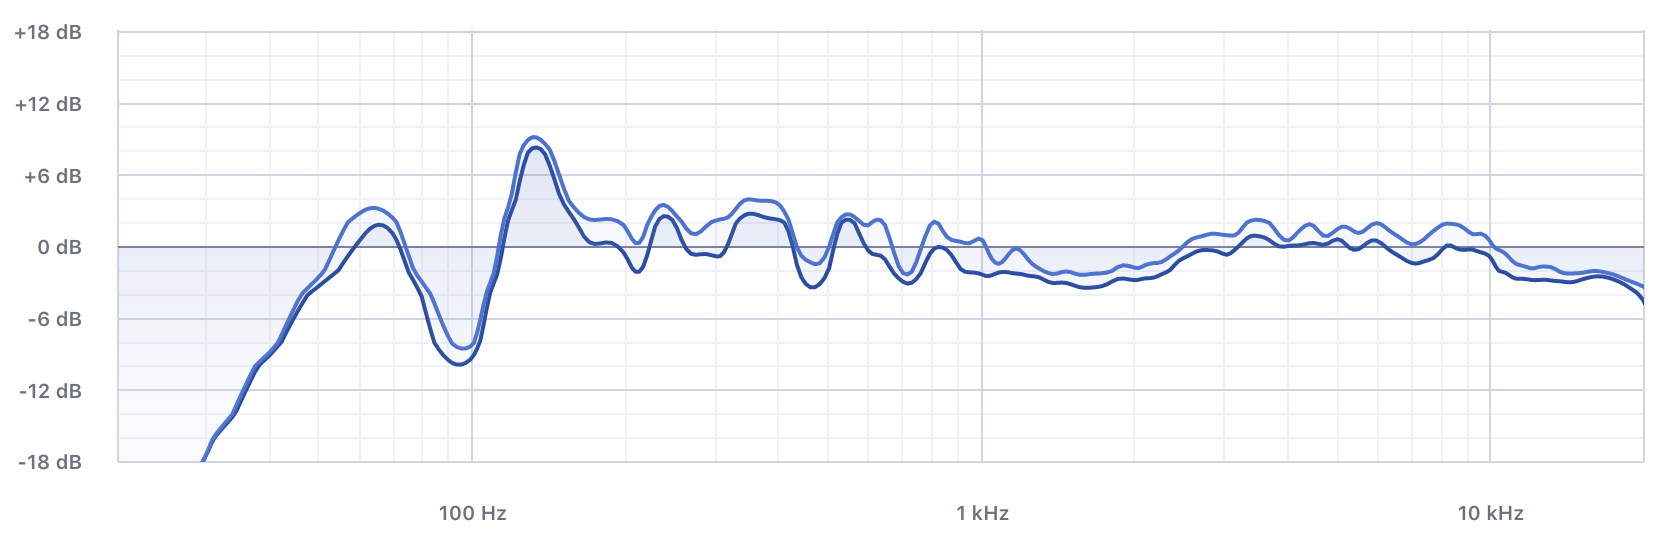
That’s because your studio is almost certainly plagued by HIDDEN acoustic problems. In fact, it’s not uncommon for home-based, DIY studios to have peaks and nulls of up to 15 dB in the low end.
You can imagine how it’s virtually IMPOSSIBLE to mix your track in that situation. These issues trick you into wasting precious time chasing ghosts in your mixes, correcting frequency problems that aren’t really there.
In this video, I cover 5 common studio setup mistakes and how to fix them. We use a typical bedroom and do scientific acoustic testing to show how bad the problems really are…and what could be sneaking under YOUR radar!
Funny thing though; I see several of these mistakes being frequently made in professional-level studios. Make sure these acoustic issues aren’t robbing you of your ability to make quality music!
This is a pretty long video, but there really was no way to present these solutions effectively in a shorter format. With this in mind, if you just have a specific question or solution you’d like to jump to, please check out the time codes in the box below! Hopefully, this will save you some time!
Here’s our game plan:
- First I’ll show you three ways to orient your room. AKA where you can place your mix position
- I’ll outline and demonstrate exactly WHY you should avoid specific room orientations
- Once we have the room set up in my recommended orientation for our demo room, I’ll take you through the process of actually testing the acoustics of the room so we can get an idea of what the frequency response looks like
- I’ll describe WHY you are having problems in your own listening space, based on the readings we got from the previous tests
- Next, I’ll show you where your mixing monitors should be placed relative to your mixing position and recommend some solutions for making these placements the most effective.
- Just so you know what to avoid, I’ll point out some common speaker placement mistakes I regularly see
- One very common issue you’ll experience in your mix studio is related to your mixing desk itself. I’ll demonstrate these issues and give you some ideal and affordable solutions for fixing these problems
- And last but definitely not least, I’ll be describing the importance of using acoustic treatment in your listening environment
Want to Skip to Something Specific in the Video?
0:00 Intro
0:22 What measurement equipment is best?
1:00 What are we going to do?
1:29 Problem #1 Room Setup
2:00 Room Configuration 1
3:21 Room Configuration 2
3:34 Bass Accumulates in Corners
4:17 Room Configuration 3
4:49 Acoustic testing the room
5:56 Reading the frequency response graph
6:20 What is the absolute worst room size to use?
6:47 What do the problems look like on a graph?
6:58 What is speaker boundary interference response?
7:14 Why is mixing in a room like this bad?
7:46 Monitor Placement and Setup
7:58 How high up should my speakers be?
8:13 What is an acoustic axis?
8:44 Common speaker placement Issue 1 (Speaker Height)
9:34 Common speaker placement Issue 2 (Angled Projection)
10:16 Monitor placement configuration 3
11:06 Recommended speaker placement
11:25 What is equilateral placement?
12:49 Mixing desk issues
13:17 What is comb filtering?
13:35 What is the best mixing desk to use?
13:50 How can I fix my current mixing desk?
14:32 Lack of acoustic treatment
14:59 What is the difference between a treated and untreated room?
15:21 Final thoughts
15:48 How to make sure you’re doing this right?
See our full privacy policy.