Try Warp Academy for Free ➤ https://warpacademy.com/free-stuff-bundle
Join our Discord Server ➤ https://discord.gg/QSYvFSM
Building a Mixing & Mastering Studio. We’re building a new mixing and mastering studio and filming the process. This is video 2 in the series where I’ll walk you through our goals and the design of the room. If you didn’t catch the first video, where I showed you the starting space before the build began, I’ll link it below.
Missed part 1? Catch it here.
This is going to be a massive deep dive, so grab some tea or coffee, and – actually, forget coffee, you might want Scotch for this.
Now that we’ve got that sorted, let’s get into it!
The first thing I’ll say is that I have a previous studio that was built in a rental space. When we constructed the room, I knew I’d have to move out of it eventually so the entire room was built using modules that could be removed and set up in a new space. Here are a couple shots of the previous room.
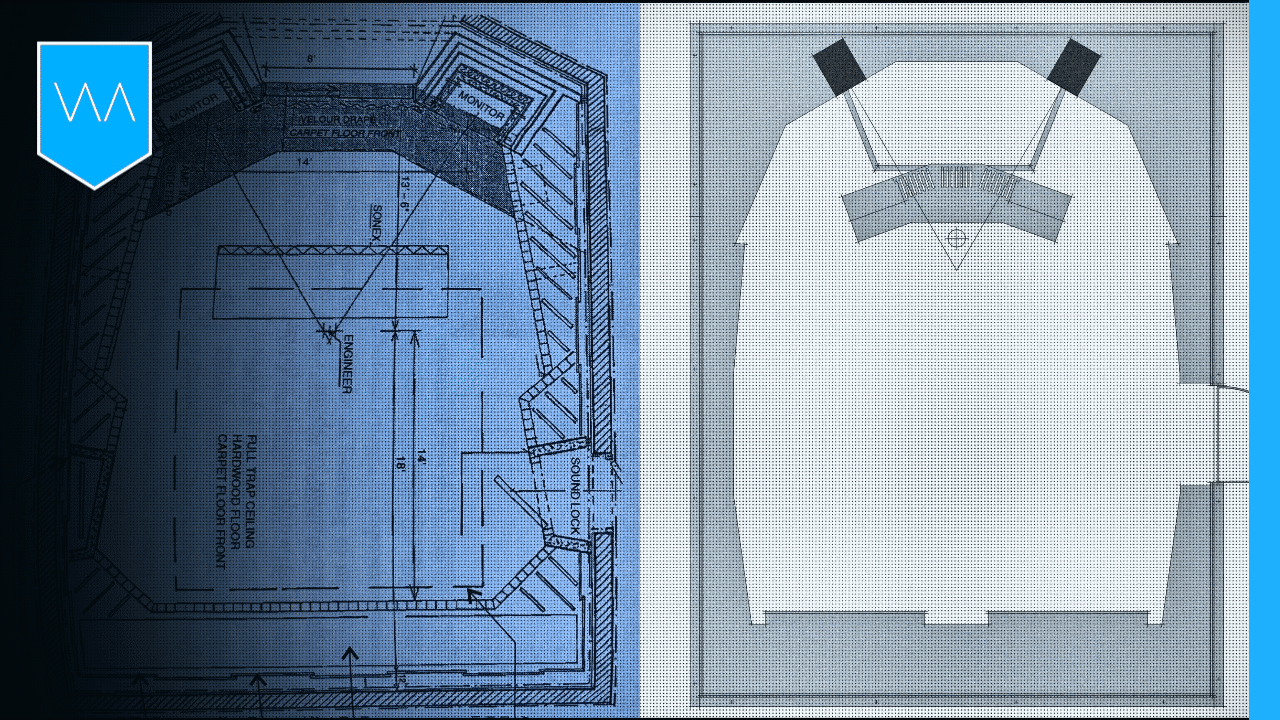
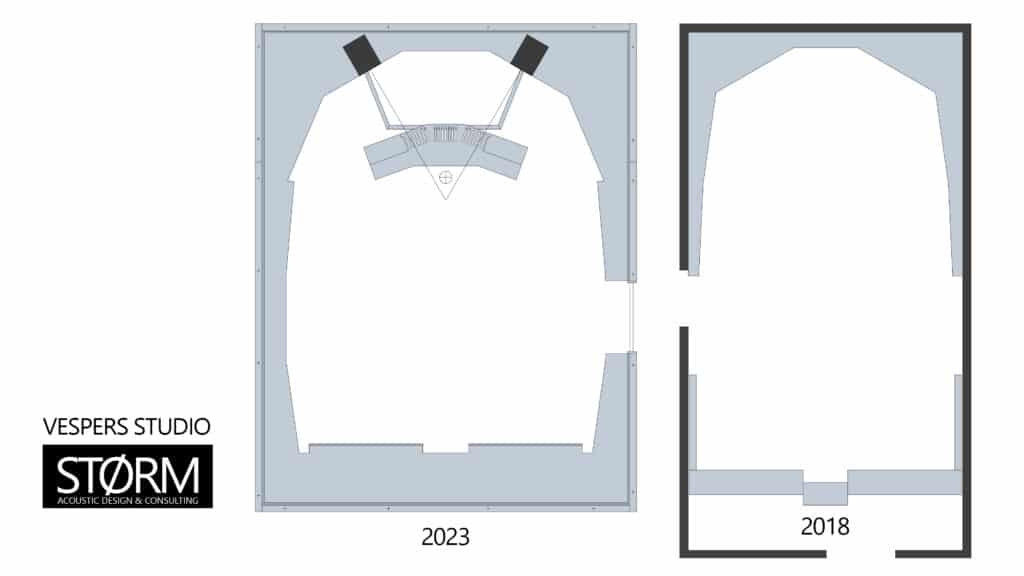
I moved out of that space in late 2019 and all the modules were in a storage locker until November of 2022 when I bought a house with a suitable space to build the new room. The new space has much larger dimensions, as you can see from this comparison of footprint. My original room is on the right and the new room is on the left. We’re also working with 10’7” ceiling height in the new room vs. 8’ in the original room, so the amount of treatment possible in the ceiling is greatly expanded.
When building a studio, it’s key to have clear goals and priorities. The purpose for this room is for audio engineering; mixing, mastering, and sound design. This is a control room not a recording studio; this is not a jam space; it’s not a creative studio with big desk filled with synths and instruments and MIDI gear everywhere. It’s a built with one core objective in mind: optimal acoustics for a control room.
This means it must have a very short decay time in the room: We aim for around 100 ms across all audible frequencies. You can see this waterfall from my 2018 studio. This is a measurement from Room EQ Wizard, which was used for all the acoustic testing. It shows amplitude, frequency and then decay time in milliseconds in the Z-axis.
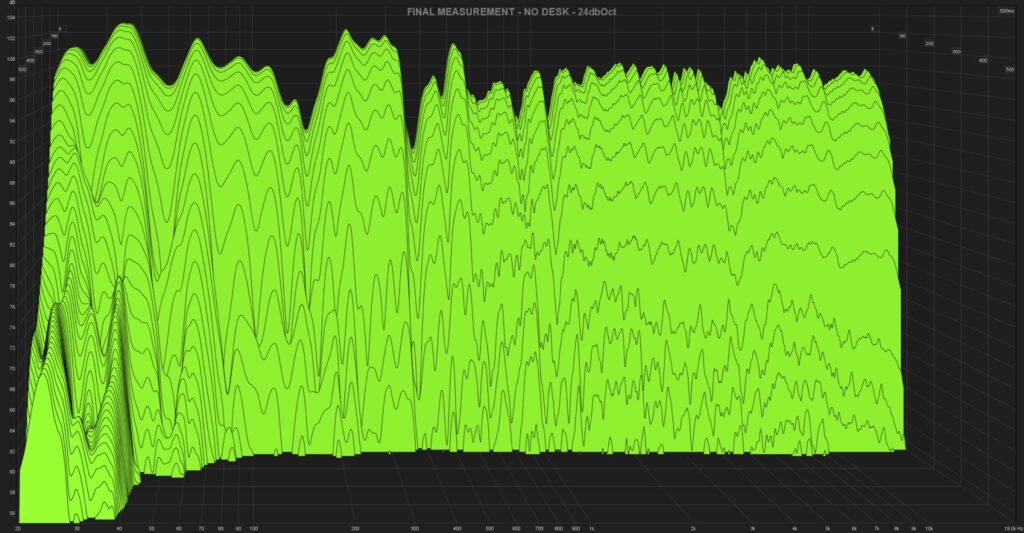
You can see we achieved a 100 ms decay time right down to 80 Hz. But below that we had some low frequency ringing that happened below 40 Hz out to beyond 500 ms. That wasn’t ideal and it was because that studio was framed inside of a family room in a house with limited ceiling height and not enough room for deeper porous absorption using low density material. This is not an issue we have with the new space. We have room for much deeper absorption, especially in the ceiling and on the back wall.
Even with that, the acoustics in that room were far better than any room I’d worked in before. In a previous studio, I had terrible small-room acoustics issue. You have huge peaks and nulls from constructive and destructive interference from all out of phase room reflections, plus you have certain frequencies ringing out much longer than others – which gives you the impression they’re louder.
Let’s get into the details of the design for the new studio now.
My acoustician and studio designer is Tom from Storm Acoustic Design & Consulting. He designed and built our first room back in 2018, and now he’s on-site doing the build for this new room. Tom used to work for GIK and has designed over 300 studios around the world. He specializes in building control rooms for engineering bass heavy music, which is exactly what we do at Warp Academy. You don’t often find people who have the design chops and the studio-specific building expertise to handle a project like this.
We’re starting by building a shell. The room the studio is in is a garage, and we have an Air BnB suite that’s adjacent to it, separated by a workshop.
The reason we’re building a shell is two fold: 1) I live in Canada, and it’s cold here. We’re building the shell partially to up the R value of the space and thermally insulate it. 2) Because we have rental suites on the property, and then neighbours, we need some isolation. Isolation keeps a higher proportion of sound generated inside the room from bleeding out and disturbing neighbours (also known as transmission loss) and it keeps some of the sound from outside the room from bleeding in and interfering with your ability to hear what you’re working on when engineering.
There’s a common misconception that adding acoustic treatment to the inside of a room somehow prevents sound from bleeding out. This isn’t really the case. Interior acoustic treatment does help to attenuate sound generated inside the room, as is the case with most residential construction. Professional studios use But the heavy lifting is doesn’t by the mass of the boundaries and that has a more prominent effect. multiple layers of high mass material as a hard boundary to minimize transmission loss so they don’t disturb adjacent rooms and compromise recording or create issues with neighbours.
It’s not uncommon to use 4 layers of drywall to create an isolation shell. Now, there’s a downside to isolation. When you prevent sound from leaking out, it’s now contained inside your room, bouncing around. Your room becomes much more reflective as mass is added to the boundaries. So interior acoustics get worse as isolation improves. This means you need more acoustic treatment in a room with an isolation shell than a room with lossy standard construction.
An isolation shell also emphasizes your room modes. As you increase isolation, you’re also emphasizing the room modes.
It’s for this reason that we decided to maximize our room volume for this build; to leave plenty of space for additional treatment modules. Plus the entire ceiling is going to be a huge porous absorber assembly with multiple layers.
In our design we went with 2 layers of drywall instead of more because we’re okay with some transmission loss, given the distance our neighbours are away from us and the fact that there isn’t a recording studio next door. Using 2 layers of drywall instead of 4 gives us better acoustics inside the room as more of the bass energy has a chance to escape.
I want to speak to the dimensions of the shell. Some people have asked if we’re using one of the golden-ratio room designs. No, we are not. Those golden ratios are designed to space out the room modes so they don’t stack on top of each other, which makes them worse. That is more relevant in a reflective room. In our case, adding a high depth of treatment is our strategy, so maximizing the interior room dimensions within the garage took priority. Our room will not be very reflective, and the room modes will be highly damped, so a golden ratio of dimensions is not as relevant.
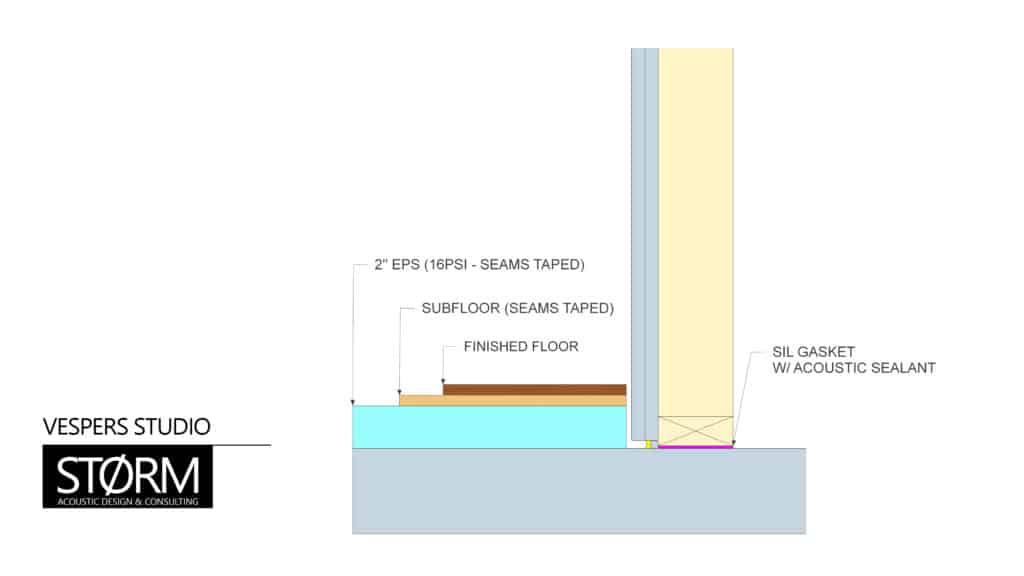
I want to take a sec and talk about the floor design. A lot of builders who don’t specialize in studio construction will tell you to use floor joists with an assembly of framing lumber like this: https://www.thespruce.com/floor-layers-explained-4120153. While that may work well for residential construction, it’s not great for acoustics. What it does is creates a series of resonant chambers underneath your studio. You might think stuffing them with rock wool sorts the issue out, but it doesn’t.
In our case, we went with a fully solid floor with EPS, then subfloor with OSB, and laminate on top of that. This ups the R value a lot and acts as a vapour barrier because the concrete slab underneath is not insulated and there’s no vapour barrier underneath it.
In this image, you can also see the wall assembly with the 2 layers of drywall and then the isolation shell wall. The construction has been designed to be as airtight as possible with a sil gasket and acoustic sealant.
The front wall is where the real magic happens in this room. A high-mass hard front wall will contain flush-mounted Neumann KH420 reference monitors that I just picked up. If you missed my video review and all the reasons I chose them as my mains, then check out my recent video in the blog here: https://warpacademy.com/neumann-kh420-focal-trio-11-be-review/.
Building a hard front all is complicated and expensive, so why do you go to all that trouble? This really could be it’s own in-depth video, but I’m going to point out the top benefits as succinctly as possible.
Benefit #1: SBIR
I’m sure by now you’ve heard of speaker-boundary interference response, or SBIR. It’s when you get a reflection off a room boundary, like a wall, the floor, or ceiling, and it rejoins the direct monitor drive signal out of phase. This causes destructive and constructive interference that can dramatically the frequency response of your room [show acoustic tests].
I’m going to quote Arqen here, a site that is a great resource for understanding acoustics for control rooms: http://arqen.com/acoustics-101/speaker-placement-boundary-interference/
“The only way to truly thwart SBIR is to flush mount your studio monitors in a hard, rigid wall. This is how main monitors (aka, ‘mains’) are mounted in million dollar recording studio control rooms.
If your studio monitor speakers are designed to be flush-mounted, the best place for them is in your wall — your speaker baffles flush with the wall surface. Your front wall becomes a giant speaker baffle. An infinite baffle.
Proper flush mounting means no front wall reflection… and that means no speaker boundary interference from your front wall!
Your speakers and wall sing in harmony. Also, flush mounting increases acoustical loading which helps drive your monitors, making them more efficient at low frequencies. It really is that awesome.”
I’m also going to quote Philip Newell, author of Recording Studio Design, as his explanation of the benefits of flush mounting is on point.
“In the top-level control rooms it is general practice to build the monitor loudspeakers into the font walls.”
“If the loudspeaker is placed within the room as opposed to being mounted flush within the boundary, it also sends low frequencies to the wall behind it, which then add to the reflexions in the room. This rear radiation leads to a wave pattern which is much more complex in the room with free standing loudspeakers than in the room in which they are flush mounted.”
You also get an increase in efficiency in the loudspeaker, especially in the low end because the sound can only travel forwards, completely in phase, rather than backwards. Philip states, “If the pressure wave cannot travel behind the loudspeaker, all the pressure is concentrated in the forward direction, so the normal forward propagation is augmented by the would-be rear radiation. What is more, the constrained radiating space restricts the ability of the air to move out of the way of the diaphragm movements. This increases the load on the diaphragm, which in turn increases the work done, and thus increases the radiated power as compared to free-space radiation. The effect is virtually instantaneous, it is equal throughout the space into which it radiates, and can be considered a part of the actual loudspeaker response in those given conditions. A response modification of this nature is minimum-phase.”
Benefit #2: Increasing the Distance to the Monitors from the Mix Position
I’ll quote Philip Newell again here: “No studio for music recording can seriously call itself professional unless it has adequate full range monitoring. Relying on small monitors that roll off rapidly below 60 Hz is not a professional approach.”
This is why I chose the Neumann KH420s by the way. They’re full range 3 way monitors with bass extension down below 30 Hz.
“However, due to the physics of electroacoustics, loudspeakers which go down to 25 Hz, or thereabouts and which can produce adequate sound pressure level, tend to be relatively large. In a small room, large loudspeakers at short distances tend not to have flat responses and the response tends to change with small movements of the head, which can be misleading. In small rooms, it is advisable to flush mount the loudspeakers in the front wall of the room. This puts them at points of maximum distance from the listening positions. Flush mounting is the only realistic option for high quality monitoring, other than in free field (anechoic) conditions. Otherwise, a maximally flat response cannot be achieved.”
Benefit #3: Improves stereo imaging
In Recording Studio Design, Philip Newell states, “The sharp edges of loudspeaker boxes, mixing console meter bridges, and any other abrupt cross-sectional changes between loudspeakers and the listener will form secondary diffraction sources that can smear stereo imaging.”
This is why you don’t want a huge mixing console in front of you, or a desk with a ton of equipment on it by the way. This is why you see a lot of speaker cabinet designs that have been bevelled or rounded like the Dynaudio cabinets and the Genelec MDE cabinets. MDE stands for minimum-diffraction-enclosure.
“The expanding wave travels along the front surface of the loudspeaker cabinet until it arrives at a discontinuity, such as the cabinet edge. From this point on it suddenly has to expand more rapidly around the corner, but the same pressure cannot be sustain in the new, larger volume into which it expands. This sudden increase in the expansion rate is due to a change in acoustic impedance, and any change in impedance will send back a reflected wave. So sound radiates from that point. The radiation that turns the corners is in-phase with the source, bur the reflected wave, due do the sudden drop in pressure, radiates back to the source out of phase. Objects in any room in which a loudspeaker Mary be positions, and especially objects close to a loudspeaker, such as the mixing consoles on which they may be mounted, can all act as diffraction sources.”
The front wall acts as an extension of the speaker baffle, which eliminates edge diffraction artifacts from the speaker cabinet. Now, there may still be edge diffraction at the edge of the front wall where it meets the side treatment, but if you’re sneaky, you can design the side wall treatment in such as way that it dramatically reduces any diffraction. This means superior stereo field and sound stage.
Benefit #4: Improves transient response
Take a look at this image. The top is a nice clean transient at the source. The bottom is one that’s been destroyed by manipulation of the phases of the component frequencies. So when you have your speakers inside a room, and you have reflective surfaces, such as the front wall, floor, ceiling, side walls etc. they all create out of phase reflections. Furthermore, the relative phases of each frequency will be different. That creates this transient smearing effect you can clearly see.
By putting the speakers in the wall you solve a large part of that problem by eliminating front wall SBIR. By treating the ceiling, side walls, and back wall, you absorb and attenuate the other reflections. You still have a hard floor though, and there is a pronounced floor bounce, but we block that by locating the desk in the reflection path.
So those are the key points about the benefits of flush mounting. There’s more there, but we’ll save that for another video. Let’s move on.
Acoustic Treatment
Let’s talk about the treatment. The goal is to create a reflection-free zone in the mix position that will effectively eliminate any early reflections that can smear the stereo image or interfere with the direct sound.
We have between 1 and 3 feet of treatment in all areas of the room except floor and front wall. When doing deeper treatment like this, you have to be very careful about what density of material you use. Many of you will have heard to use OC703 (rigid fiberglass 3 lb density insulation product, super common in acoustic panels, pre-dates rock wool) or rock wool. These products come in many different densities. If you’re only doing a 3” thick panel, you can use higher density material. But the thicker you go, that’ll start to work against you.
Each material, rock wool included, can become increasingly reflective the thicker it gets. Yep, that’s right, I said reflective. So if you use, say, 2 feet of rock wool (density?) it’ll actually start reflecting sound back into your room, thus defeating the purpose of thicker absorption.
What you want to do is use material that’s the correct density for its depth. The density you choose should be relative to the thickness of the treatment.
That leads to an important question I know some of you will have. Are we air gapping behind the absorption? We are and we aren’t. In some places in the room we are gapping, and in others we aren’t. The effectiveness of air gapping is design and situation dependent.
Rear Wall
Let’s talk about the rear wall. In the back of the room we have rear modules with wooden slats on them. The slats provide a bit of scattering in the upper frequencies, which helps the room not to sound totally dead. It’s key that we have a hard floor for this to optimally effective, as a carpeted floor will be absorptive to a degree.
The slats have been cut at different thicknesses using a formula, and attached to the thick rear wall absorption modules so that the reflective wooden surface alternates with the absorptive surface.
The rear modules also have nice CNC panels with the Warp Academy logo, back lit with LEDs to add some color and light to the room.
★ STAY IN TOUCH ★
Discord: https://discord.gg/QSYvFSM
Instagram: https://instagram.com/warpacademy
TikTok : https://www.tiktok.com/@warpacademy
Facebook: https://facebook.com/warpacademy
★ ABOUT WARP ACADEMY ★
Warp Academy empowers artists to reach their full potential, create exceptional music, and live their passion. We’re a global, online collective that includes music producers, audio engineers, label owners, sound designers, festival organizers, booking agents, managers, leading audio brands and more.
We hook you up with all the education, tools, and connections you need to create professional-quality music and launch a successful career. You can learn almost any topic by searching our library of hundreds of free tutorial videos and production tools. Join us. We’re stoked to meet you!
Try Warp Academy for Free https://warpacademy.com/free-stuff-bundle
Join our Discord Server: https://discord.gg/QSYvFSM