- Sorry, this product cannot be purchased.

REFERENCE by Mastering The Mix
$65.00
Ever felt your mix didn’t sound as good as your reference tracks? It can be frustrating not knowing exactly how to get your music comparable to your favorite mixes. That’s why we created REFERENCE. It’s packed with powerful tools and never seen before insights to help you get closer than ever to the sound of your favorite music.
NOTE: All sales of software products are final and do not include refunds.
Download the Free Trial of REFERENCE
Watch an In-Depth Walk-Through on Mastering with REFERENCE
Ever felt your mix didn’t sound as good as your reference tracks? It can be frustrating not knowing exactly how to get your music comparable to your favourite mixes. That’s why we created REFERENCE. It’s packed with powerful tools and never seen before insights to help you get closer than ever to the sound of your favourite music.
Trinity Display
- The visuals in the Trinity Display show you how your frequency balance, stereo width and compression compares to your reference track. You can also solo the movable frequency bands allowing you to zone in on the intricate differences between your mix and your references
Level Match
- The powerful Level Match tool allows you to instantly and accurately match the loudness of your track and your references. This is crucial for a fair comparison.
Track Align
- The time-saving Track Align button identifies if you have different versions of the same song and lines them up automatically, so you can seamlessly switch between them.
Wave Transport
- The Wave Transport allows you to create multiple loops so you can quickly compare various sections of your track to your reference.

Shaun Frankco – wrote the chart-topping single “Closer” by The Chainsmokers.
Since I mix a lot of my own music, REFERENCE has become one of my main plugins. I love how it let’s me SEE the areas that need improvement in my mix almost instantly and has drastically shortened the time it takes me to produce finished tracks. Thanks for such a great tool!
Jonas Westling
Lady Gaga, Paul McCartney, Melanie C, James Arthur, Newton Faulkner and Gabrielle Aplin.
Love REFERENCE! Would not want to do a mix without it.

Dirty SouthDJ / Producer
Just bought REFERENCE… which is incredible and I absolutely love it!

Music Tech9/10 & Choice Award!
“An excellent, well-designed plug-in that offers unique and useful visual insights into your mix and references.”
![]()
FlosstradamusDJ / Producer
I’m a big fan of these plugins, they’re just what I’ve been looking for!
![]()
Audio Plugin guy4.8/5
Bottom line: My mixes will be better using Reference.
![]()
Bedroom Producers Blog
Reference is a tool which makes comparing audio tracks quick and easy, but also offers a set of sophisticated analysis features, which would be much more complicated and time-consuming to achieve with other existing tools.
James F Reynolds credits include Calvin Harris, Due Lipa, Ellie Goulding, Sean Paul, Snoop Dogg…+ LOADS More
“Reference is an amazing plugin that helps me make accurate mix decisions and cuts out the guess work”.
Specifications
Available in VST, VST3, Audio Units and AAX formats (all both 64-bit and 32-bit).
MAC OSX Requirements
OS X 10.8.5 or higher. 32-bit or 64-bit AU, VST 2/3 or AAX host.
WINDOWS Requirements
Windows 7, 8 or 10. 32-bit or 64-bit VST 2/3 or AAX host.
Overview
REFERENCE can help you get closer than ever to the sound of your favourite music. It does this by giving you the tools and insights you need to get your productions sounding more like your reference tracks.
The Wave Transport allows you to create multiple loops so you can quickly compare various sections of your track to your reference.
The powerful Level Match tool allows you to instantly and accurately match the loudness of your track and your references. This is crucial for a fair comparison.
The time-saving Track Align button identifies if you have different versions of the same song and lines them up automatically, so you can seamlessly switch between them.
The visuals in the Trinity Display show you how your frequency balance, stereo width and compression compares to your reference track. You can also solo the frequency bands allowing you to zone in on the intricate differences between your mix and your references.
Load REFERENCE
To get started, load an instance of REFERENCE on the master bus of your project. REFERENCE should go after your metering plugin, we recommend our comprehensive metering plugin LEVELS of course
Wave Transport and Tools
Add A Reference
To load a reference track, drag and drop your file into the Wave Transport, or click the ‘+’ icon. You can drag and drop multiple files onto the waveform if you have more than one reference track.

MIRROR / FREE
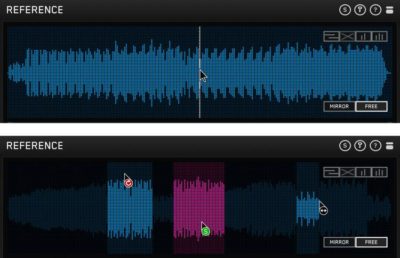
In the bottom right corner of the Wave Transport you will see the MIRROR and FREEbuttons. MIRROR will match the playback location of your reference to your DAWs transport. This is useful for when you have a different version of the same track you’re working on and want to seamlessly jump between the versions at the same point in the song. When FREE is activated, you can navigate to any part of your reference track by clicking on the waveform in the Wave Transport.

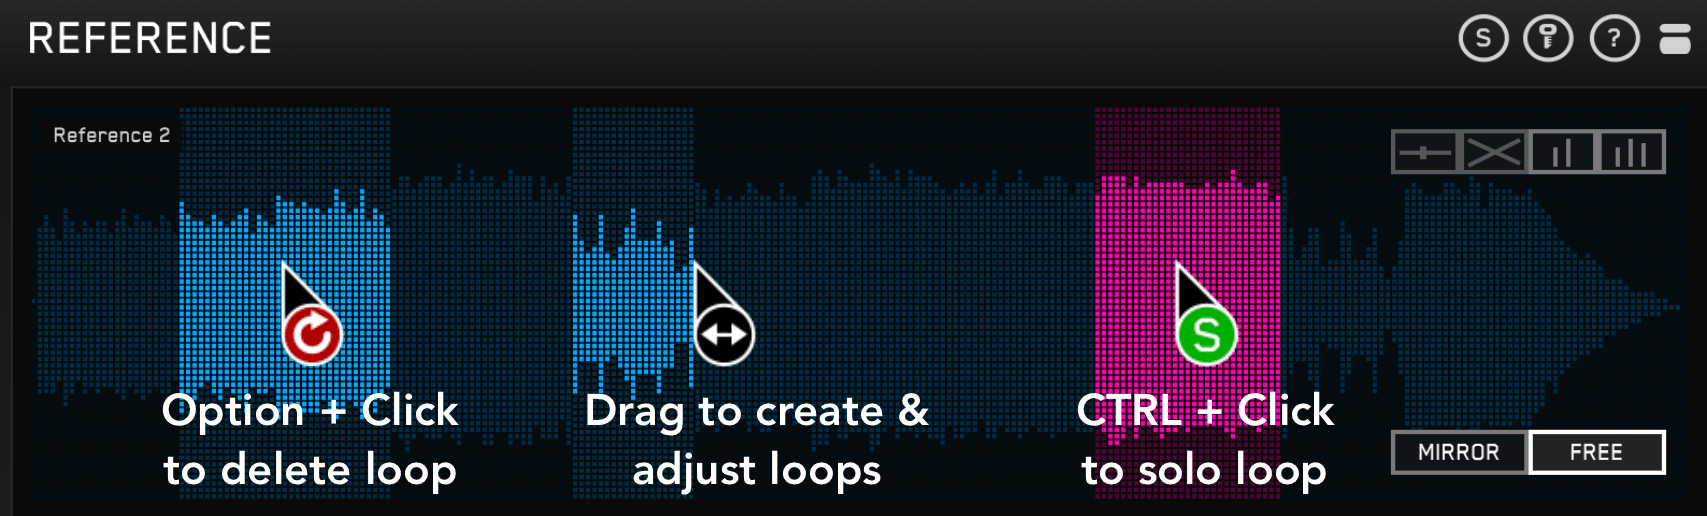
Loops
You can create loops in FREE mode. To create a loop, select and drag over the part of the waveform you wish to loop. You can create as many loops as you want. To toggle a loop on and off ‘Ctrl+Click’ on the loop inside the Wave Transport. To remove all loops, ‘CMD+Click’ anywhere in the waveform section. Loops are not available in MIRROR mode.
Level Match
In the top right corner of the Wave Transport you will see the Level Match button. When selected, this will accurately match the perceived loudness of the track you are working on and your reference. This is an absolutely crucial stage in comparing audio. Louder sounds give humans the illusion that they have a thicker bass and more clarity in the high frequencies. By level matching you’ll be able to compare the tracks fairly and make mixing decisions with confidence. Click the Level Match again to remove the level matching.
If you have multiple reference tracks, another button will appear adjacent to the Level Match button. This button, when clicked, will level match ALL of your reference tracks and the original track you’re working on.

Track Align
When you have different versions of the same mix or master, there can be slightly different lengths of silence at the beginning of the tracks. This can be really annoying and time consuming when you have to line them up to jump between them seamlessly during referencing. The Track Align button does this laborious job for you in an instant so you can spend your time mixing.
When you load a new reference track, the Track Align button will show that it’s ‘thinking’ by the two lines moving back and forth. If Track Align detects that you have loaded a reference track that is a different version of the track you’re working on (i.e. an alternate mix or master) the Track Align lines will stop moving and become clickable. When you click Track Align, the selected reference will become aligned to the original track you are working on. If the reference track is not an alternate version of the track you’re working on the Track Align button will show a slider (more info on this below).
If you have multiple versions of the same song, another button will appear adjacent to the Track Align button . When selected, this button will automatically align any tracks that are an alternate version of the original track you are working on.
(note: Track Align works best when you play the original in your DAW from the beginning)

Manual Track Align
If the reference track is not an alternate version of the track you’re working on the Track Align button will change to show a slider. Click to open the sample slider.
The slider direction works as if you were moving audio from within your DAW. Move the slider to left to move your reference track forward, and move it to the right to delay it. Click the ‘Mix’ button to preview both your Original and Reference at the same time. This can make it easier to line up the two tracks manually.
To re-open the sample slider hover your mouse over the slider icon. Take your mouse off the wave transport to minimise the sample slider.

Central Tools
Track Tabs
The Track Tabs display what tracks you’ve loaded into REFERENCE. Add a reference file by dragging and dropping your file onto the Wave Transport, or by clicking the plus icon ‘+’ to the right of the Track Tabs. Click the minus icon to the right of the Track Tabs to remove the selected file from REFERENCE. You can toggle between your different references by clicking on the tabs. Double click on a Track Tab to change the label.

Original / Compare Buttons
The Original button is selected as default and you will hear the audio you are working on in your DAW. The REFERENCE button will enable playback of whichever reference track is selected in the Track Tabs. The buttons are linked so you don’t have to move your mouse to switch from Original to Reference.
(Note: Left arrow key toggles between Original and Reference. change this to any key you like in settings)

Meters
Both the Original and REFERENCE buttons have adjacent meters giving you the peak, integrated LUFS and gain readings for the tracks you are comparing. Click on the readouts to reset the meters.

LUFS, PEAK, GAIN – Main readout
Click on the LUFS, PEAK or GAIN text to switch between the three different readouts for your original and reference track.
LUFS (loudness units relative to full scale) is an incredibly useful measurement as it gives you an accurate display of the perceived loudness of audio material.
PEAK will tell you the peak of your audio measured in dB (decibels).
GAIN will tell you how much gain you have increased or decreased your track by.

Gain Slider
You can use the gain slider to adjust the gain of either the Original or REFERENCEtrack. The gain slider has a default range of -12dB to +12dB (can be increased to +-18dB in the settings). When using the Level Match feature, the gain of one of the tracks will be changed to match the other. You can see any gain increase or reduction on the gain slider and you can adjust the amount if necessary. To set the gain back to 0dB double click or ‘Alt+click’ on the slider.
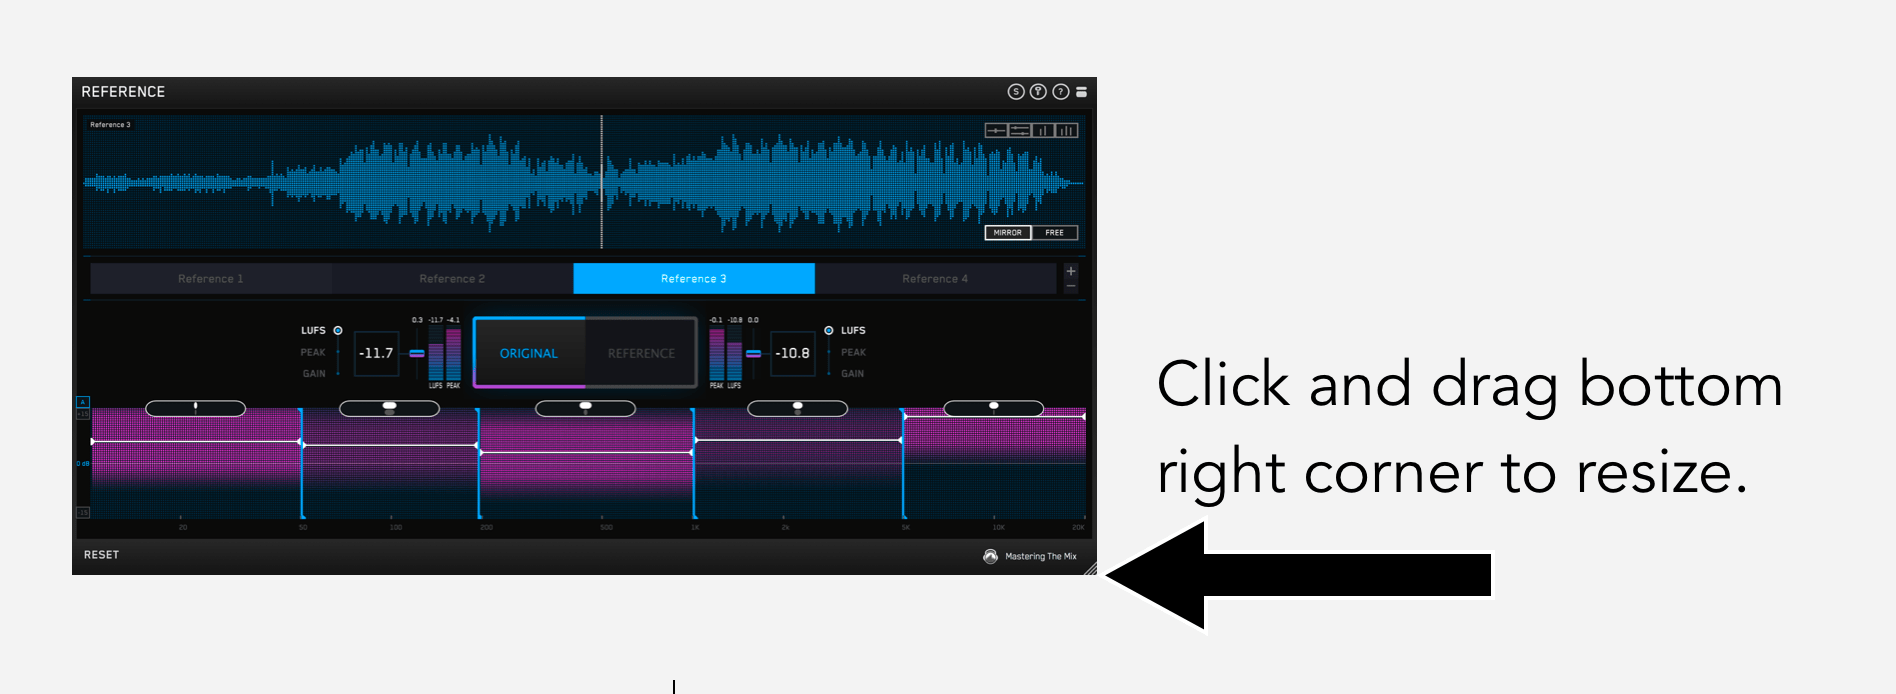
Resizing

Trinity Display
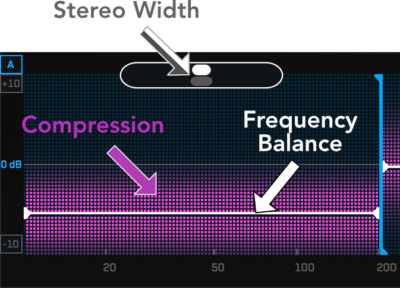
When you listen to your reference track and you compare it to your own music, it can be difficult to put your finger on what changes you need to make. The one-of-a-kind Trinity Display uses intelligent algorithms to show you how the frequency balance, stereo width and punch of your track compares to your reference. You can create from 1 to 5 moveable frequency bands in the Trinity Display. Each band gives you a specific reading of how the punch and balance of your track compares to the punch and balance of your reference in the corresponding frequency band.

The Frequency Bands
The Trinity Display lets you analyse your music using from 1 to 5 frequency bands. To solo one of the frequency bands click anywhere inside the band. Click once more to un-solo that band and listen to the whole mix again. Soloing the bands is a great way to zone in on the intricate differences between your mix and your references.
To create a new frequency band divider, ‘Ctrl+click’ anywhere on the Trinity Display. Once a divider is created you can move it by clicking on it and dragging it. To remove a divider, ‘Ctrl+click’ on the divider itself.

Stereo Spread
The Stereo Spread displays the stereo width of both your original track and your reference. Each frequency band has it’s own Stereo Spread display allowing you to quickly identify which frequencies are wider or narrower. The two horizontal lines represent your Original track (the upper horizontal line) and your reference track (the lower horizontal line). Whichever you are monitoring will be highlighted white.
Understanding the stereo spread of both your original track and your reference will help you get closer to the sound you want. You can use panning in your DAW or a stereo tool to reduce or increase the width of a frequency band in your track.

Balance
The Trinity Display has a thin, faint white line through the middle. This represents 0dB. The white horizontal Level Line tells you how much perceived volume that frequency band has compared to the same frequency band in your reference track.
The white Level Line will move into the upper half of the Trinity Display if the frequency band has more perceived volume than the corresponding band in your reference. The Level Line will descend into the lower half of the Trinity Display if the frequency band has less perceived volume than the corresponding band in your reference.
Looking at the example below, we can determine that from 0-200Hz, our original track has less energy than our reference. This might prompt us to boost the volume of our bass, or add a low-frequency EQ boost to our kick. We can also see that from 200-2kHz our original track has a similar amount of perceived volume to our reference. So we might not change this at all. Finally, we can see that from 2kHz to 20kHz, our track has more perceived loudness than our reference. We might decide to musically reduce the high frequencies sticking out in our mix. Alternatively, we might decide that we like the clarity of our mix and leave the EQ balance as it is.

Punch
The purple Punch Dots in the Trinity Display will tell you how the short-term dynamic range of your track compares to the short-term dynamic range of your reference. The Punch Dots will move towards the white Level Line if that frequency band is more compressed in your original than in the corresponding frequency band of your reference. The Punch Dots will move away from the Level Line if that frequency band is less compressed in your original than in the corresponding frequency band of your reference. The more opaque the dots are the larger the difference between the punch of your track and the punch of the reference.
In the example below we can see that the low frequency band from 0-200Hz is showing the Punch Dots moving towards the Level Line. This tells us that our original track has more compression in the low frequencies than the reference track. This might prompt us to reduce the compression on our kick or bass elements. We can also see that from 200-2kHz the Punch Dots are barely visible. This means our original track has a similar amount of compression to our reference. Finally, we can see that from 2kHz to 20kHz, the Punch Dots are moving away from the Level Line. This means that the high frequencies are punchier in our track than in the reference. We may decide to compress these transients using a multi-band compressor, or we might decide that we actually like the punchy top end and leave it just as it is.

Changing The Scale
The Trinity Display has 4 different scales, +-5dB, +-10dB, +-15dB and +-20dB. By default the range will automatically change depending on the readings. To change the scale manually to a broader or more magnified setting, click the +/- numerical readouts at the bottom left or top left of the Trinity Display. If you are mastering a track and you want to visually see the intricate changes you have made then +-5dB would be the most magnified setting. Click the ‘A’ button to engage Automatic range setting.
Why The Trinity Display Works
REFERENCE shows you visually what you would be able to hear if you were in a world- class studio.
Trying to get your mix or master to match the frequency spectrum of a reference track simply will not work. This is because there are so many variables that affect how a track sounds (such as instruments, tuning, performance, samples etc). The music won’t necessarily sound good even if your track and the reference look the same on the frequency spectrum. The Trinity Display has a unique approach to this… REFERENCE uses a complex algorithm created to specifically identify how the human ear perceives certain frequencies relative to the balance of the whole mix.
Settings
You can change the default settings of REFERENCE to suit your workflow. Click the (S) icon in the top right corner, choose your preferred defaults then click save.

Create Your Own Presets
Create and recall presets using the plugin wrapper in your DAW. When you create a preset you will be able to recall the reference tracks, the loops, the Level Match adjustments and the Trinity Display settings.
We recommend creating presets categorised by genres you work in. You can then quickly recall your favourite reference tracks with the loops already created.

| Specifications | Available in VST, VST3, Audio Units and AAX formats (all both 64-bit and 32-bit). MAC OSX Requirements OS X 10.8 or higher. 32-bit or 64-bit AU, VST 2/3 or AAX host. WINDOWS Requirements Windows 7, 8 or 10. 32-bit or 64-bit VST 2/3 or AAX host. |
|---|---|
| Plugin Category | Mixing & Mastering |
You May Also Like
-
Kilohearts Phase Plant Synth + Toolbox ULTIMATE Bundle
$499.00 -
Mixing and Mastering
$349.00 -

Vespers Bundle
$1,181.00 -
EXPOSE by Mastering The Mix
$39.00 -
Source Code with Giom
$49.00 -

LEVELS by Mastering The Mix
$65.00 -
Mixing and Mastering Bundle
$548.00 -
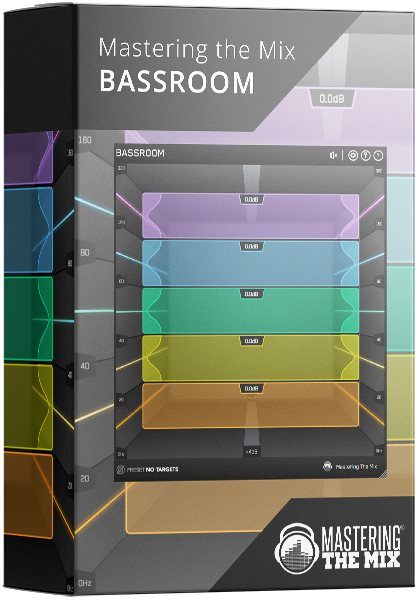
BASSROOM | Final Mix and Mastering EQ
$70.00 -
$199.00
-
DJing with Ableton Live
$249.00 -
Ableton Push 2 Jumpstart
$99.00 -

ANIMATE by Mastering The Mix
$78.00

