- Sorry, this product cannot be purchased.

ANIMATE by Mastering The Mix
$78.00
ANIMATE helps you inject life into your mixes in a precise, versatile and colorful way. With four different movement modes, each with individual frequency assignments and mid/side functionality, you’ll get your music jumping out of the speakers precisely how you want.
NOTE: All sales of software products are final and do not include refunds.
ANIMATE helps you inject life into your mixes in a precise, versatile and colorful way. With four different movement modes, each with individual frequency assignments and mid/side functionality, you’ll get your music jumping out of the speakers precisely how you want.
![]()
![]()
![]()

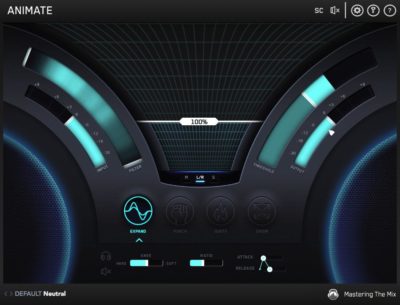
EXPAND
- Expand mode allows you to dial in a pristinely clean sounding upward expansion. This increases the volume of signals over the threshold, giving your audio more dynamic range in a transparent way.
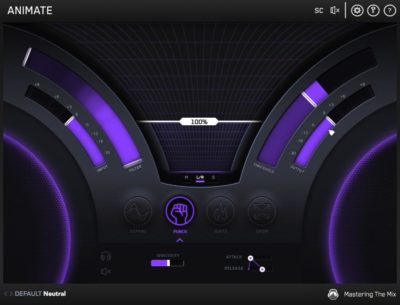
PUNCH
- Punch mode enhances the transients of your audio. Whether you want to subtly accentuate the high-frequency transients in the mid-channel of your master or bring out serious smack on an individual channel, Punch can handle the task.
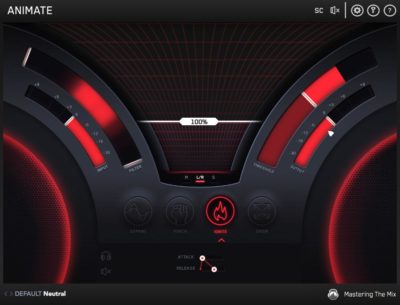
IGNITE
- Ignite mode allows you to dial in rich harmonic distortion in a dynamic way based on the input signal. Ignite can increase the perceived loudness, power and presence of a channel without the pumping effects of a compressor.
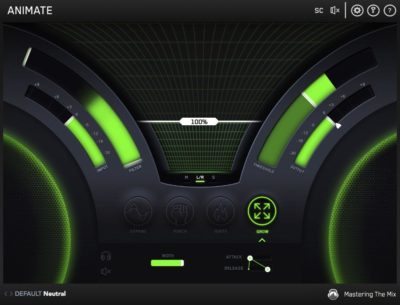
GROW
- Grow mode lets you increase the width of the selected frequencies using a psychoacoustic precedence effect. Grow lets you spread specific frequencies SUPER wide in a dynamic way like never before.
Specifications
Available in VST, VST3, Audio Units and AAX formats (all both 64-bit and 32-bit).
MAC OSX Requirements
OS X 10.8 or higher. 32-bit or 64-bit AU, VST 2/3 or AAX host.
WINDOWS Requirements
Windows 7, 8 or 10. 32-bit or 64-bit VST 2/3 or AAX host.
Mixing and Mastering With ANIMATE
ANIMATE was designed to be your secret weapon in a wide range of mixing and mastering scenarios. It’s sonic versatility and precision will help you get your sound jumping out of the speakers exactly how you want. This page will provide some examples of where ANIMATE’s powerful tools can be utilized.
![]()
Upward Expansion In Mastering
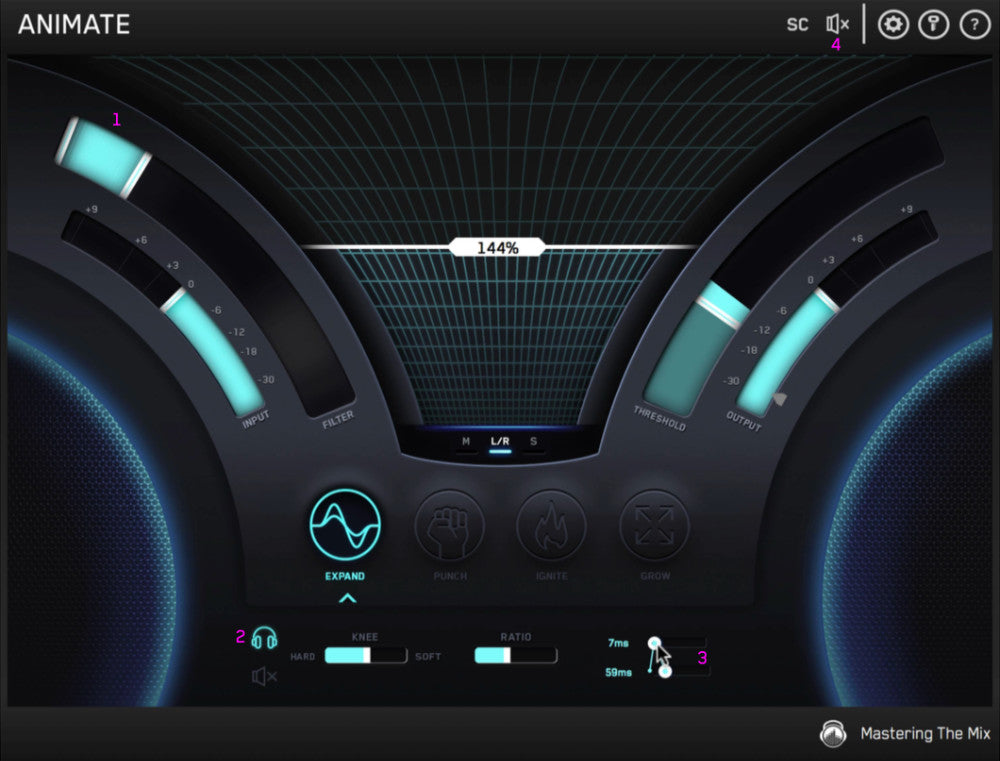
When fine-tuning your master, you might want to subtly lift a single element out in a dynamic way without affecting the whole frequency spectrum. Lets say you wanted to bring the vocal forward. You would select the frequency1 of the vocal (around 750Hz-3kHz) and hit the ‘M’ button2 to select only the mid channel. The dry lead vocal signal is usually mono in a mix so it’s easier than most elements to isolate during mastering. Adjust the threshold3 to make sure the selected frequencies surpasses it. Locate the ratio4 slider at the bottom of ANIMATE and set it to around 1:2. Now increase the amount5 to expand those frequencies and hear how the vocal is musically lifted in the balance of the master. Tweak the ratio, attack and release to work perfectly with your audio.
The glow of the speakers in the bottom corners is representative of the effect ANIMATE is applying to the audio. The brighter the glow, the greater the effect.

Bouncing Bass Lines
Bouncing bass lines are essential if you want to move people either emotionally or physically. ANIMATE let’s you dramatically increase the dynamics of any performance.
To get the whole bass line bouncing, disengage the filter1 by pushing the sliders to the far ends. Set the threshold2 so the audio you want to increase surpasses it. Set the ratio3 to around 1:3 and increase the amount4 slider until you feel your bass line is jumping the way you want it to. Hit the solo5 button to monitor the effect ANIMATE is having on your bass line and tweak the attack6 and release to work perfectly with your audio. Going for a longer release can give a more musical effect in this scenario.

Glistening Lead
Expand mode can bring out the glistening top end of a lead ( … and any other channel you want to boost). Set the filter1 to only react to the highest frequencies of the lead sound. You’ll see the input audio glowing behind the filter, you can use this as a guide to select the relevant frequencies. Set the ratio2 to around 1:1.5. Change the threshold3 so the audio you want to effect surpasses the threshold. Now increase the amount4 until the lead feels like the top end is glistening.
This effect will increase the perceived volume of the channel, so you’ll want to reduce the output level. The output slider has an arrow5 to show you the perceived loudness of the audio before you added the effect. Click on the level match pointer and toggle the bypass button to make sure your mix decisions are improving your mix, not just making it louder.
To make a mix shine, you just need a few elements to occupy the highest frequencies. Too many channels with strong high frequencies will sound harsh and will give you and your audience ear fatigue.

Targeting Specific Frequencies In A Sample Loop
Expand mode can help you bring out a specific element embedded within an audio loop. For example, if you had a drum loop and you wanted to accentuate the snare, hi-hat or kick, you could isolate the specific frequencies using the filter1 then increase the ratio and amount to bring them out in the mix.
Click the solo2 button in the Expand control panel to monitor what effect Expand is having. Whilst listening in solo, adjust the attack and release3 to get a clean sound that works with the sonic timing of your audio. For example, if you have a tight hi-hat sound you might got for a fast attack and fast release so the expander returns to a non-expanding state quickly after the short audio tail of the hi-hat.
The global bypass4 button in ANIMATE will help you ensure you’ve made a positive impact on your sound.
Snare, Cymbals & Percussive Hits
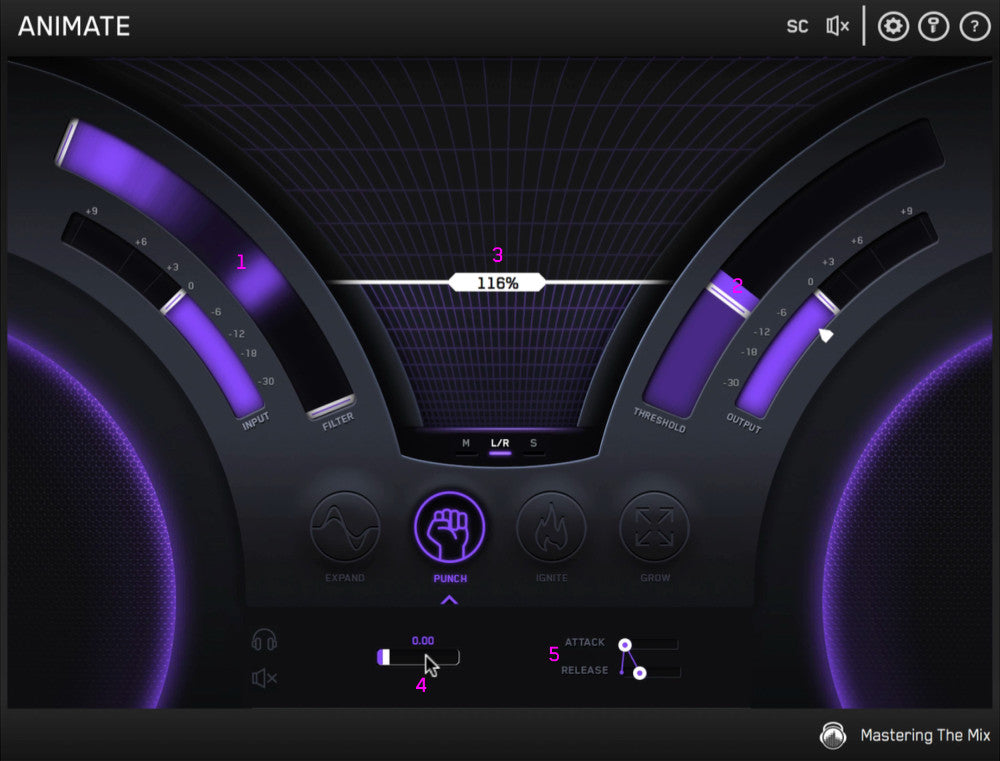
The snare plays a significant role in setting the vibe for your track. If your snare is weak, your track will lack energy. Punch mode will help you accentuate the transients of your audio in a frequency specific way with mid/side precision. This makes it the perfect tool to get your snare, cymbals and percussive hits smacking through the mix.
For a snare hit you would probably want to apply the punch effect to the whole frequency1 spectrum, though selecting specific frequencies can yield interesting results such as changing the tone and attitude of your snare. Make sure the audio signal is surpassing the threshold2 and begin to increase the amount slider3 . Once you feel the snare is punching through the mix effectively, begin to tweak the sensitivity4 , attack and release5 settings to work well with your snares signal.
Punch uses different gain envelopes to determine transients. A low sensitivity will allow more transients through, whereas a high sensitivity will only allow the most prominent transients through.
Kick Punch
As the main driving force behind most productions, the Kick transient needs to poke through the mix in a musical way.
One approach is to select the upper mid frequencies to bring out the ‘click’ of the kick. Another approach is to select the lower mid frequencies1 to accentuate the transient in the body of the kick. Watch the kick’s input audio glowing behind the filter and fine tune the filter handles to work perfectly with your kick. Increase the amount2 until you feel your kick is punching through the way you want it to. Increasing the transient will increase the overall loudness of the kick, so you might want to reduce the output level to match the level it was before you increased the transient. Use the level match3 arrow on the output slider as a guide to help you adjust the output to match the input loudness.
Be sure to jump between listening in solo and listening to the kick in the context of your whole mix. You can also isolate what effect Punch is adding by clicking the headphone icon4 . Zooming in and out like this can help you ensure your making positive progress on your mix and not just aimlessly adjusting the sound of your audio.

Getting Synths and Bass to Bite Through
When a synth feels lost in a mix, an EQ might help but might also introduce harshness. Try using Punch to get certain frequencies to bite through. Selecting the mid frequencies1 and increasing the transients can lift a synth or bass without changing the tonal balance in an obvious way.
The mid frequencies require careful attention as you don’t want to overpower the vocal. You might choose to only apply the effect to the side channels. To change the processing from left and right ‘stereo’ to ‘side’ hit the ’S’ button2 . Set the threshold3and begin to increase the amount4 slider. If you want a more subtle punch reduce the sensitivity slider. Increase the sensitivity5 slider for a more obvious transient accentuation.

Character & Grit Buss Processing
For a fast way to liven up a mix on the fly, create an aux channel1 and load up an instance of ANIMATE. Set up an extreme punch setting and send2 any channels that you feel could do with more character. You might dial in Ignite mode too for more grit (more on Ignite later).
Subtly sending a few channels into ANIMATE as you create a song can help you get fast results and keep your creativity and inspiration flowing. A quick mixing win like this will boost your confidence and momentum during the production process.

Inflate Your Synths
Ignite mode adds musically relevant harmonics to your audio giving it a rich sonic texture. Not only does this give your audio a perceived boost in loudness, it can also enhance the clarity and body of your audio. Ignite is a great tool to inflate your synths and give them more presence in the mix.
Disengage the filter1 by keeping the sliders at the far ends. Pull the threshold2 right down so the audio is almost always surpassing it. This will mean the effect kicks in even when the channel is outputting a very low level. You can also set the attack3 to moderately fast and the release4 to slow to ensure the whole signal is treated. Make sure to tweak these settings whilst soloing the effect as super fast attack and release settings can introduce crunchy distortion. Bring up the amount5 slider until your synths are sounding rich and full of character. If you want to really push Ignite to deliver more aggressive results, you might need to reduce the output6 level.

Vocals on Top
Ignite can help you get your vocals sitting perfectly on top of your tracks arrangement. Once you’ve controlled the dynamics of your vocal and you’ve EQed a great tone, Ignite is an awesome option to lift the vocal sonically and make it the star of the song.
Disengage the filter1 and set the threshold2 to work with your vocal. The vocal might be louder during the chorus than the verse so jump between both sections when setting the threshold. You could set the threshold so Ignite only kicks in for the louder vocals in the chorus giving a dynamic lift full of added character. A short attack3 and medium to long release4 should work well with a vocal. A little goes a long way with the amount5 slider, so you might not need to increase it much if you’re only looking to subtly lift your vocal.

Rich and Expressive Guitar Tones
When you use the filter in unison with the Ignite amount slider, you can dramatically change the tonal balance and dynamic expression of a channel. If you feel like your guitar channel needs to be injected with life, try Ignite.
Set the filter1 to around 1kHz-3kHz, set the threshold2 and add some fire by increasing the amount3 slider. Try pushing the amount a bit further than you feel works with the track and tweak the filter to generate different tones. Once you find something that captures your attention, adjust the amount slider to pull back on the intensity of the setting so it works well within the context of your whole mix.
Now you’ve got a great new tone, try adjusting the threshold so only the loudest 20% of the guitar performance gets Ignited. This will give the guitar a more dynamic and expressive sound.

Adding a Sonic Lift to Your Drop or Chorus
Ignite can increase the perceived loudness of your audio. It’s ability to react to the dynamics of your audio means you can use Ignite to add a sonic lift to your whole track or just the louder transients within your track.
Make sure the filter1 is disengaged then navigate to one of the louder sections of your track. Set the threshold2 so this section is surpassing the threshold. Jump to one of the quieter sections to see if the verse is below the threshold. If it isn’t then you could automate the threshold. The automation should mean that Ignite is only activated during the drop or chorus. Once that is set up, start to increase the amount3 slider whilst monitoring the drop. Once you feel you’ve pumped up the drop enough, hear how the transition from verse to build-up to drop is sounding. The chorus should feel like it has an explosive impact when it drops.

.
Encapsulating Pads
Mono drone pads can give your arrangement a solid tonal foundation and thicken up your mix. They can also feel a bit static and monotonous. Grow can add movement to your pads to make them more of a ‘feature’ rather than simply ‘filler’.
Set the filter1 to work well with your pad sound and then pull the threshold2 right down so any time your pad kicks in it will activate Grow. Set the width3 depending on how wide you want your audio to sound, then increase the amount4 slider until the width of the pad feels interesting in your mix. Now try increasing and decreasing the threshold so the pad evolves from wide to mono and back again.
You can now automate the threshold on the channel to change the width of the pad throughout the track. These little touches all add up to keep your listener totally engaged with your production.

Subtle Bass Width for More Kick Clarity
Getting the kick and bass working well together can feel like a never-ending battle. There are a number of ways to minimise kick and bass conflict, this one is a bit different. The kick and bass are often mixed either mono or very centrally. They’re competing for both frequencies and space in the stereo spectrum. We can make a step toward resolving this conflict by pushing the mid frequencies of the bass wider when the kick plays.
To do this, pull up an instance of ANIMATE on the bass channel and side-chain1 the kick audio. Activate the external side-chain by clicking SC2 . Set the threshold3 to work with the input level of the kick. The signal that surpasses the threshold will trigger Grow. Adjust the width4 slider and increase the amount5 slider to get a feel of how wide you want the bass to go. I would suggest a subtle approach here as you still want the bass to feel fairly central, just not entirely mono. Now select the frequencies6 that you want to push wide. Try to only push frequencies above 250Hz wide as keeping the fundamental notes of the bass mono will help keep your mix sounding solid. By making the mids of the bass a little wider you’ll give space to the body and click of the kick to occupy the mono space. This should add clarity to both parts. Play with the release so the bass returns to a more central position relative to the length of the kick tail.

Super-Wide Guitar (or Anything)
You can get any channel sounding super wide in seconds with Grow mode in ANIMATE. To get a constant wide sound, make sure the threshold1 is on it’s lowest setting. This will mean all of the audio on that channel will run through the effect and be pushed wide. The wider you go the more chance of phase cancellation. Get creative and push the settings to the limits, but check the mono compatibility before settling on a final sound. Sometimes sending audio to an instance of ANIMATE on an AUX channel and pushing the settings to limits can give an interesting spatial effect and minimise phase issues. You can click the solo2 button (headphone icon) to only output the wet signal on the aux channel.

Combinations
The examples given have looked at using only one processing mode at a time to focus on what each feature is capable of. You can combine any or all of the four movement modes to get your audio jumping out of the speakers exactly how you want. The modes work in serial from left to right, So your audio will be processed by Expand, then Punch, then Ignite and finally Grow.
You might choose to add Punch to the low end of your kick to increase the transient, then top it off with some Ignite on the mid frequencies to add presence and character to the ‘click’ in a dynamic way.
In another scenario you might inject some upward expansion to the lower mids of a string section to enhance how expressive the performance is. You could also dial in a touch of Ignite on the upper mids to add some character and vibe to the sound. You might also use Grow to widen the higher frequencies during the louder phrases of the track.
The possibilities and applications for ANIMATE are truly endless.
PRO REVIEWS

James F Reynolds:
Calvin Harris, Dua Lipa, Ellie Goulding, Sean Paul, Snoop Dogg…+ LOADS More
“Love it! It’s like the Swiss Army Knife of plugins!”

Pro Tools Expert
ANIMATE adds colour and depth to tracks in really expressive and musical ways whereas other plug-ins of this type can often touch the sound too much. ANIMATE, if used sparingly, lifts and energise tracks in a mix in ways that I have not experienced before.

Funkagenda – Grammy Winning Producer
This thing is pretty fire, I have to say. BIG user of Mastering The Mix products, but this is a Swiss Army Knife plugin. SO many applications!
![]()
Audio Plugin Guy
ANIMATE can make delicate instruments more expressive and it can turn drum elements into savage pumping machines. A sound designer will love ANIMATE, and it belongs in many mixing engineer’s arsenal. Simply put, this kicks ass.
| Specifications | Available in VST, VST3, Audio Units and AAX formats (all both 64-bit and 32-bit). MAC OSX Requirements OS X 10.8 or higher. 32-bit or 64-bit AU, VST 2/3 or AAX host. WINDOWS Requirements Windows 7, 8 or 10. 32-bit or 64-bit VST 2/3 or AAX host. |
|---|---|
| Plugin Category | Mixing & Mastering |
You May Also Like
-
REFERENCE by Mastering The Mix
$65.00 -
Mixing and Mastering Bundle
$548.00 -

LEVELS by Mastering The Mix
$65.00 -
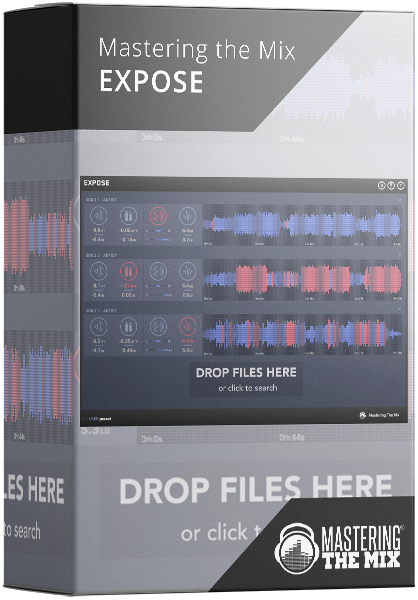
EXPOSE by Mastering The Mix
$39.00 -
Source Code with Giom
$49.00 -
$199.00
-

Vespers Bundle
$1,181.00 -
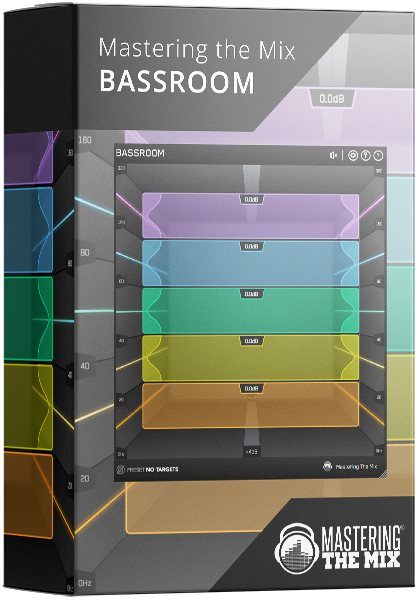
BASSROOM | Final Mix and Mastering EQ
$70.00 -
Mixing and Mastering
$349.00 -
Kilohearts Phase Plant Synth + Toolbox ULTIMATE Bundle
$499.00

